Showing posts with label tutorial. Show all posts

Saturday, 18 January 2014

Drafting a lace overlay for an underbust corset

This article was first published on the amazing corset-making website www.foundationsrevealed.com in 2012.  Thank you to the lovely team at FR for allowing me to re-post the article in full here!

Drafting a lace overlay for an underbust corset

As a costumier working in a particular niche area, there's nothing I enjoy more than combining a lovely curvy corset with delicate lace and sparkling embellishments.
To me, there's nothing more satisfying than holding a shimmering costume piece under various lights and enjoying the reflection of hundreds of Swarovski crystals and beads...

Orange corset with black lace by Flo Foxworthy

For this article we'll be drafting a simple border lace overlay for the top half of an underbust corset (pictured here in Orange silk with black lace). We'll be using a technique called pattern manipulation, if you've done much pattern drafting for regular clothing then you've probably used this technique to manipulate darts.
If you've never drafted anything then don't worry – it's not complicated and once you get the hang of it you'll be able to try all sorts of new design ideas!

This method can be used to create a lace (or any other fabric you care to try) overlay that is shaped to fit your corset exactly, creating the perfect base for some serious embellishment.
The same technique can also be used to draft a pattern for the lower edge of a corset (see corset in Emerald silk with fuchsia lace). Just follow the instructions below, but trace the lower half of the pattern instead of the top half.

Emerald corset with fuchsia lace & beaded flowers

There are already many excellent articles on Foundations Revealed that discuss the various methods for constructing your corset, so this article won't cover any of those details.
For the purposes of this article, i'll assume you have already constructed the outer shell of your corset (or you have constructed your single layer corset), and are ready to attach the lace overlay.

Tools required:

A finished pattern
It's best to use a pattern that has already been fitted and that you are comfortable using. This can be a pattern you've drafted yourself or one you've purchased, all that matters is that you are happy with the fit and are ready to take the design a step further.

I will be using a pattern I drafted as an example, but if you're using a purchased pattern then I suggest you lay it out on a smooth flat surface (your dining room table will do nicely if you don't have the luxury of a dedicated work space) and weight it down securely so it won't shift during the tracing process.

Tracing paper
I use a heavy weight tracing paper known as Vellum (available at most art supply stores), it's used by architects and is fantastic for patterns like this. It is translucent to allow for easy tracing and sturdy enough to stand up to repeated use as a finished pattern piece.
There are a variety of materials you could use instead; waxed paper/freezer paper from the kitchen, light-weight tracing paper, clear plastic sheets etc.

Mechanical pencil
When drafting patterns it's always a good idea to use the finest pencil you can, to allow for greater accuracy. Mechanical pencils are ideal for this purpose as they're always sharp and create a fine even line.
If you're tracing on to plastic sheet, then use a fine tip marker pen – Sharpies are available in a 0.4mm tip.

A ruler and a curve
It's preferable to use a ruler and a curve to maintain accuracy (but if you're more comfortable tracing free-hand then I won't tell you off).
It's also helpful to have a grading ruler on hand if your pattern has a seam allowance included, as a fast way to draw in your stitching line. If you don't have a grading ruler, then you can just measure the seam allowance with a regular ruler.

Lace border


Choosing your lace


It's great if you have the piece of lace you'll be using in front of you at this stage, so you can play with the lace and use it to it's best effect;
For example, if it's a floral lace, pay particular attention to the leaves and petals and position the lace so they flatter the lines of your corset.
Does your lace have a mirrored design or does the design all go in one direction?
Does the lace have a definite right and wrong side or can you flip it and use the reverse without it being obvious?

If your lace has a mirrored design or you can get away with flipping it and using the reverse, then you can create a perfectly mirrored overlay that is the same on the left and right sides of your corset.
If your lace can only be used on one side (e.g. corded lace) and the design only goes in one direction, then take a little time to plan out what part of the lace you'll use on the left and right sides – you want the design to look balanced, even if it's not identical.

Drafting the pattern


To begin, decide where on your corset you'll be placing the overlay; For this example we'll be placing it on an angle at the front of the corset, extending up to the side.
We'll start at the centre front and go through each piece one at a time till we get to the centre back.

Please note: My original pattern does not have any seam allowances added, so I can just trace the lines as they are.
If your pattern DOES have seam allowances included, then take a few minutes to draw in the stitching lines (this is where a grading ruler comes in handy). When drafting patterns it's much easier to do it without the seam allowances included.


Trace around the 1st pattern piece (front), marking the waist line accurately.


Move your tracing paper to the 2nd pattern piece and line it up along the stitching line, checking that the top of the pieces and the waistline match. Trace the 2nd pattern piece down to the waist and mark the waistline accurately.


Repeat step 2 for each pattern piece, making sure to trace them in the correct order. Remember to mark the waistline on each piece so you can line up the next piece perfectly.

You now essentially have a pattern version of the top half of your corset – just like if you were to lay the finished corset out so that the top edge were flat.


Decide where you'd like the overlay to be placed, and draw it on to the pattern. In my example I started at the 3rd busk loop and angled up towards the back

This is where the tracing paper comes in doubly handy – you can now lay your new pattern piece on top of the lace and mark in the shape of the edge and any design features that will help you with the placement, such as seam lines and bone channel positions. Doing this will make it easier to ensure that your placement is perfectly even on both sides of the corset when the lace is attached.


Cut out your new pattern piece – you don't need to add any seam allowances as they've all been eliminated in the manipulation process.

If you've used a sturdy tracing paper, you can simply use that piece as the actual pattern. If you've used something very light-weight, you may want to carefully trace around it onto a piece of card (or whatever you usually use for your patterns.


Trace the pattern piece onto your lace. You will have already planned what part of the lace you'll be using for each side, so carefully trace and cut each piece as accurately as possible.


Mark any important details such as bone placement lines etc using a fine chalk wheel or thread tracing.

Now it's time to attach the lace to the corset! As mentioned at the start of this article, we're jumping right in and assuming you have already constructed the shell of your corset so carefully place your lace pieces on the corset making sure to line up your placement lines so the pieces are positioned equally on the left and right sides. Use a ruler if necessary, checking that the lace details are balanced.


Pin the lace in place and carefully stitch along the border edge to secure it to the outer layer of corset fabric. 

If you're hand-stitching, use tiny stitches so they aren't obvious, and if you've already inserted your busk and attached your lining then slide your hand between the corset layers to ensure you don't stitch right through to the lining.
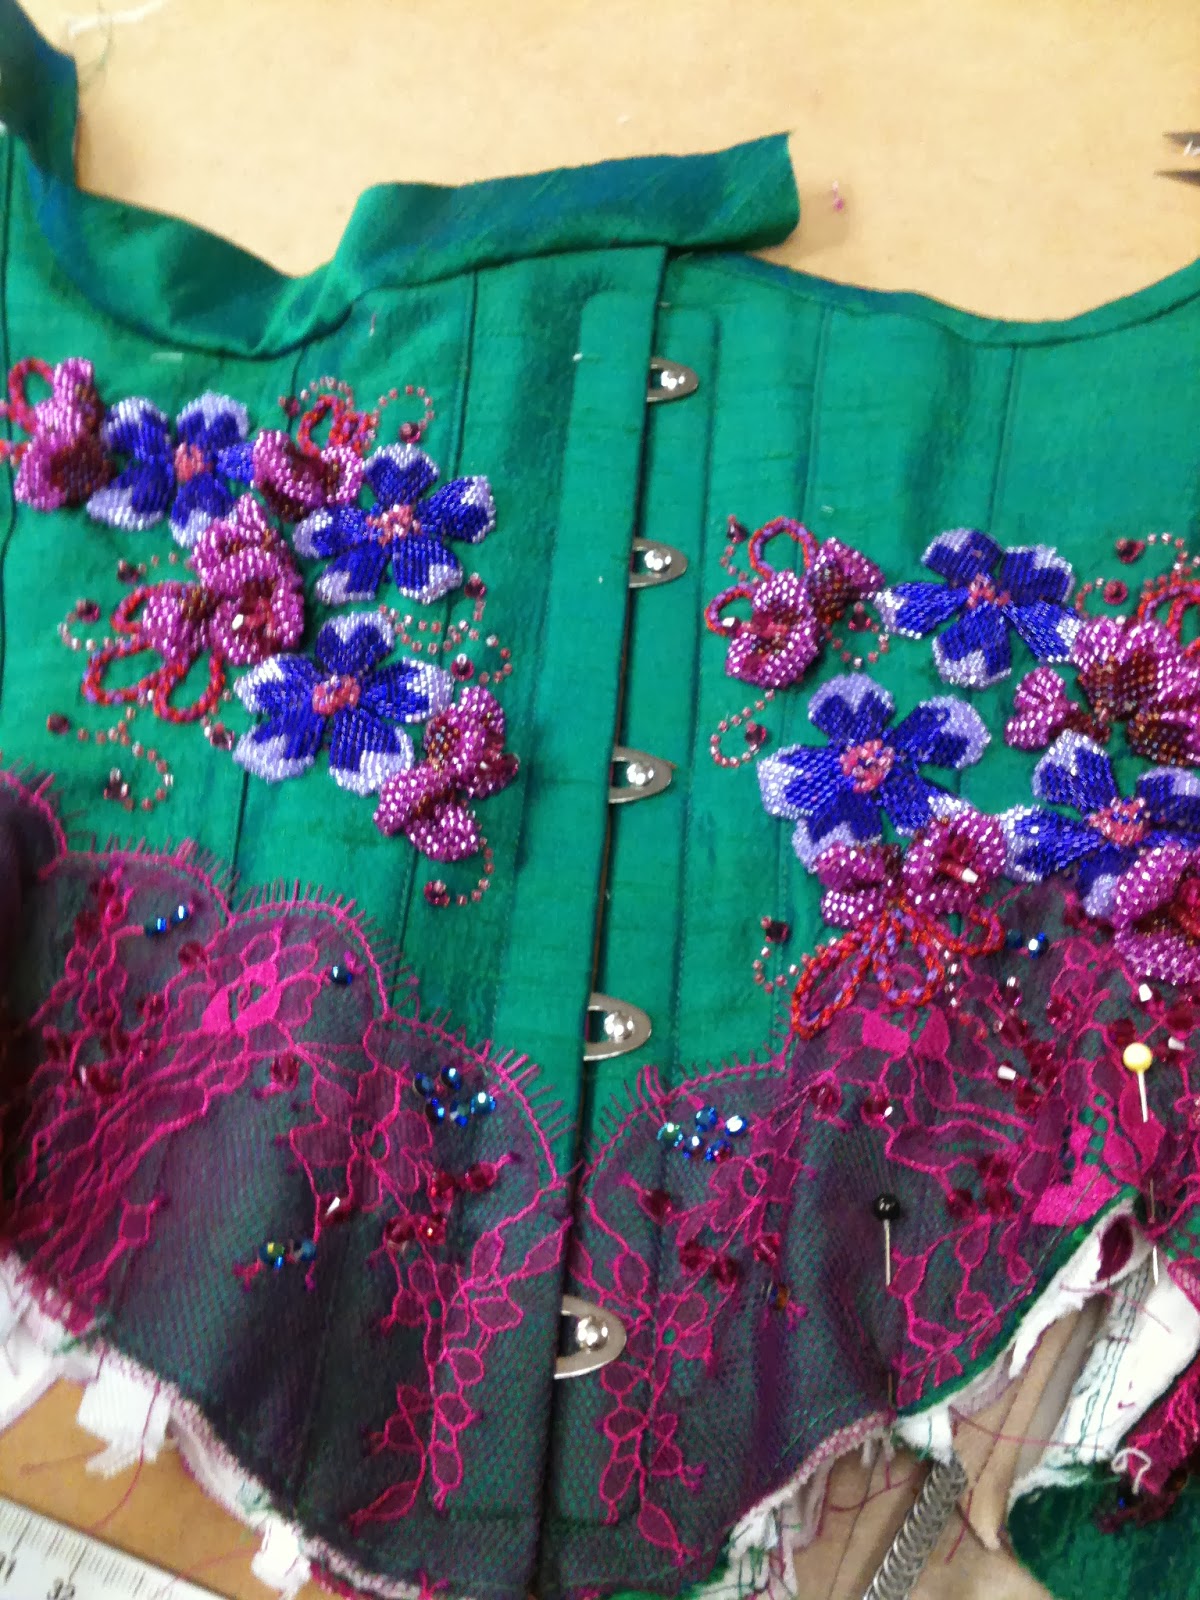
Beading the corset before finishing the binding

If you plan to bead the lace, do the majority of the work now - although don't attach beads right up to the edge until after binding, leave those areas till last or you'll just end up breaking something under the machine foot!

If you're making a single-layer corset then think about the threads that will be showing on the inside and try to be as tidy as possible.
Note: You are welcome to machine-stitch the lace to the corset if you like, but I think it's more elegant and effective to use invisible hand stitches – it's all down to personal taste.

You are now ready to continue constructing your corset and bind the top edge - if you're using external casings over the lace then apply them now.
Once your corset has been bound and had eyelets inserted, you can now finish any beading around the edge of the corset... and if you have plans for further embellishment then the fun starts now!

Embellishing your corset

Swarovski beads & rhinestones on a burlesque corset by Flo Foxworthy

As I mentioned earlier in the article, heavy beading should ideally be done before the binding is attached, this makes it easier to stitch through the fabric – it can be somewhat difficult (but not impossible) to stitch large areas of beading to a finished corset.

When beading a corset, use a strong synthetic fibre that won't fray against the edges of the beads. I like to back-stitch two or three times through each bead to make sure it's secure and won't snag easily on other garments.

When planning the embellishment for your corset, look carefully at the design on the lace and consider the effect you'd like to achieve. Do you want a delicate, feminine look or a bold colourful statement piece?

Lace and Swarovski crystal rhinestones on a red burlesque corset

It's fun to use a variety of colours and textures in your embellishment to add depth and interest to the garment. Pick out the details of the lace using flat-back rhinestones on spots, bugle beads on leaves, and groups of round beads on petals.. Try using unusual embellishments such as shells, mirrors or tiny silk flowers and be adventurous with your choice of colour!

Even a simple muted colour scheme can be enhanced using beads in two or three similar shades. Embellishments don't need to be sparkly – maybe pearls or frosted glass beads are more suited to your style. It all adds to the texture of a beautiful and unique garment.

The options are endless, and only limited to your imagination. Have fun creating something completely unique!

Fairy corset by Flo Foxworthy

Tuesday, 14 January 2014

Embellishing a lace corset

This article was first published in 2012 on the amazing corset-making website www.foundationsrevealed.com  Thank you to the lovely team at FR for allowing me to publish the full article here!


Tutorial - Embellishing a lace corset with Swarovski rhinestones and beads

Embellishing a lace corset with Swarovski rhinstones & beads

By Flo Foxworthy - November 2012

This month i've been working on a costume for a New Zealand-based burlesque performer named Leda Petit.
Leda is a stunning young woman with a face and figure straight out of a black & white film from Hollywood's golden age, and I always enjoy creating costumes for her that are elegant and striking, while still remaining feminine and pretty.

In this article, i'll be looking at choosing the embellishments for her corset, and how I go about attaching these delightful sparkly things to garments.
The main colour theme for this costume was Navy lace on nude, to give the impression of lace against bare skin - this is one of my favourite looks, and it can be really effective when embellished with sparkling details.

Choosing the embellishments


When considering the embellishments for this costume, I decided to use a selection of Swarovski rhinestones and beads in various sizes and shapes to compliment the design of the lace border.
Rather than use one single colour, I chose to use two shades of blue and a lovely steely-grey as an accent.
The variety in colour and shape helps to add depth and interest to the overall design – the Dark Indigo stones give flashes of deep blue/black, and the Meridian Blue stones appear to be blue/turquoise from the front but reflect violet, red and gold from different angles.

Swarovski rhinestones & beads for a burlesque costume

I estimated what i'd need by looking at the floral design on the lace and counting how many times each feature was repeated.

The final list may seem excessive, but from past experience i've found that it takes far more rhinestones and beads to cover an area that you initially think!

Corset embellishments:
Round flat-back rhinestones (size ss20) – Dark Indigo x 700 pieces
Round flat-back rhinestones (size ss20) – Meridian Blue x 700 pieces
Round flat-back rhinestones (size ss34) – Dark Indigo x 50 pieces
Round flat-back rhinestones (size ss30) – Meridian Blue x 100 pieces
Bicone beads (4mm) – Dark Indigo x 700 pieces
Bicone beads (4mm) – Jet x 80 pieces
Rivoli sew-on rhinestone (10mm) – Crystal Silver Night x 10 pieces
Teardrop sew-on rhinestone (12x7mm) – Crystal Silver Night x 90 pieces
Bugle beads (not Swarovski) – Royal blue and Steel blue

Total 2430 pieces (excluding bugle beads) 


Constructing the corset

To begin, I drafted an underbust corset with four attached garters. Leda wanted the appearance of a dramatic waist reduction, but still needed to be able to perform in the garment, so I gave the corset eight panels per side and curved it up around her ribcage to give her plenty of room to breathe.
The corset had four layers in total:
Nude satin (fused with a firm cotton interfacing), lace overlay, white coutil, floating lining.
I used a combination of flat and spiral steels, and because the panels were so narrow (around 3cm at the waist), I used only one bone per seam.

Cutting the corset pieces

I wanted to have as few visible seams in the lace as possible, so instead of cutting the lace in panels to match the corset pattern I chose to use pattern manipulation to re-create the corset in as few pieces as possible.

Cutting the lace overlay pieces

Placement of lace overlay on the corset front

In the end I used three lace pieces per side:
1: Centre front extending around the side above the waist
2: Side front below the waist
3: Back
4: Filler piece for the back (this piece was not needed after all)

The lace I used for this costume had pretty floral sprays all over, so I was able to shape the lace pieces around the curves of the corset by carefully trimming around the edges of the sprays and overlapping instead of creating darts (this helps to give the appearance of an almost seamless layer of lace around the body).
I trimmed away the excess fabric, and using tiny stitches I secured the lace to the corset while closing the “seams” in the lace. The lace overlay needed to be secured to the nude satin layer, so I used a clear nylon thread to stitch through the layers with tiny stitches, catching the coutil layer along the corset seam lines to prevent it from slipping around or pulling and getting saggy.

Hand stitching lace to the front of the corset

When stitching the layers together, I kept the turn-of-cloth in mind so the layers won't pull in opposite directions when the garment is worn. To do this, I never held the garment flat when stitching - I used my free hand to support the garment from the inside, allowing it to curve over my hand while I stitched from the outside.

Beading the corset

My corsets are mainly worn by performers, so the embellishments need to be as secure as possible – I can't have them catching on other costume pieces, or coming loose easily.
A bridal or evening corset may be worn only once or twice, and you may need only to stitch through each bead once to secure it to the garment.. but a burlesque costume will be worn many times (especially if the performer has invested in a serious piece), and may even be thrown around on stage or piled into a suitcase, so all embellishment needs to be as secure as possible.

Once the lace was all attached and secured to the corset, I was ready to begin the beading.
I've found it's easier to do the majority of the beading on a corset prior to finishing and binding the edges, just to prevent any accidental stitches making their way through the lining.
At this point, I tried to bead anywhere that wouldn't get in the way of the binding etc, leaving about 2” from the top and bottom edges so there was plenty of room for stitching the binding on without catching any beads in the process. These areas would be beaded once the binding was finished.

Beginning to bead the corset

Note: remember to leave clearance room around your busk loops so that you can open and close the busk without catching on any beads or rhinestones!

Beading the front of the corset

Once again, I used the clear nylon thread (but it's entirely a matter of preference), doubled and knotted. I began by taking a couple of small stitches in place to secure the thread, then stitched through the bead and back through the fabric.
I tried to keep my stitches as close to the bead as possible, and I usually triple stitch each bead to ensure that it is secured firmly. I also caught the coutil layer with at least one of the three stitches in each bead if possible.
Attaching Swarovski rhinestones to the corset with invisible thread

Another benefit of triple stitching is that some beads have a tendency to cut through the threads, particularly if they are able to move around and rub against the thread due to loose stitching. If your bead is triple stitched then it can't move around and is less likely to be cut.
I finished each bead by taking a small tight stitch through the fabric underneath the bead ) rather than making a knot), then continued to the next bead by taking a stitch under the satin layer of the corset and bringing the needle out where the next bead is to be placed.

It's a slow process, but the end result is firm secure beading that doesn't move when you run your hands over it (or wear another garment over it).

Finishing the corset

Once the majority of the beading was done, I completed the corset by attaching the lining, inserting bones, finishing the back, binding the top and bottom edge and attaching the garters.
Once the binding was been finished, I continued beading any areas that had been left out earlier and then it was time to apply the rhinestones.

Beading the lace burlesque corset

Applying rhinestones

When it comes to rhinestones, not all are created equal.
Swarovski and Preciosa are probably the most well-known brands, and they have their reputations for a reason. Their stones are of excellent quality and are the most reliable when adhered to a garment.
The most popular rhinestones to use on garments are the round flat-back rhinestones. They come in a wide range of colours and sizes, and even some shapes.
You can choose between hotfix or non-hotfix stones. Hotfix stones have a heat-set glue on the back of each stone and require a special tool that holds the stone and heats it ready for application.
Non-hotfix stones need to be glued to the garment using an appropriate adhesive such as E6000 or Gemtac.

There are many imitation stones available, they may be labelled as DMC / Korean / acrylic etc. These are absolutely fine for crafts or for a low budget costume, but the quality isn't great so if you're working on a special piece then I strongly suggest you purchase genuine Swarovski or Preciosa stones – they aren't as expensive as you may think, and the vibrant sparkle is totally worth it.

It's a great idea to lace your corset onto a pillow prior to gluing, so that your corset is stretched out smoothly and you have a rounded surface to work on.

To apply rhinestones to fabric using a water-based glue like Gemtac, simply dab a small dot of glue directly onto the fabric and place the stone in glue. You want to use just enough glue that it surrounds the edge of the stone when it is put in place – but not so much that you end up with a messy ring of glue though!

To apply rhinestones using a stronger glue like E6000 is a little trickier, but worth the effort.
I find it's best to pick up each stone with tweezers and apply a little smear of glue to the back of the stone before placing it on the fabric. Once again, you need just enough glue to cover the back of the stone and slightly surround the edges but not so much the you create a thick ring of glue.
Some people prefer to apply dots of the glue to the fabric using a toothpick before placing the stones onto the glue dots, but E6000 has a tendency to become stringy and you risk leaving little trails of glue all over your fabric.

Be sure to let your glue dry completely - most glues will be touch-dry within 20 mins, but it's best to let the glue “cure” overnight before you try your corset on.

Gluing rhinestones takes a little practise to perfect your technique, but once you get the hang of it you'll want to stick them to everything in sight!

Gluing Swarovski rhinestones to the burlesque corset

The finished corset

Once the glue was dry all that was left was to do a thorough check for any loose beads or rhinestones that hadn't adhered properly (I did this by running my hands over the corset in all directions).
The final step was to stitch pieces of velvet ribbon over the garter clips, this is a lovely finishing touch that's easy and really completes the look.
To do this, just fold a piece of ribbon in half and cut it to the correct length (just a touch longer than your garter clip). Carefully seal the cut edge using a lighter to prevent fraying, then thread it through the bar on the clip.
I then secure the ribbon by taking a couple of small stitches on either side. It's simple and effective!

Garters on the lace burlesque corset

Et Voila! A fully beaded and rhinestoned corset fit for a burlesque queen.

Navy lace burlesque corset with Swarovski crystal rhinestones & beads

Saturday, 9 February 2013

Making ostrich feather fans with acrylic staves

Tutorial - How to make ostrich feather fans
I often receive emails from people wanting to know how to make their own ostrich fans, so I thought I'd post this tutorial showing how I construct fans using the acrylic staves I design and sell here.

Instructions for constructing Ostrich feather Fans using Flo Foxworthy acrylic staves.


Please note that this page is very image-heavy.

Step 1:

Prepare your fans by selecting 12 ostrich feathers (per fan) and ensuring they are the same length. Trim the end of the quill if necessary using heavy scissors or side cutters/bolt cutters.
Your fan staves come with all the necessary nuts, bolts, washers, cable ties and nylon thread.


Step 2:

Clean the rhinestone inlay holes with isopropyl alcohol or a similar product (rubbing alcohol or vodka will do the trick!). Be sure to wipe the stave thoroughly with a clean rag after cleaning to remove any residue.  This is to ensure the glue has a clean surface to adhere to, to prevent the rhinestones from falling off.


Step 3:

Use a toothpick or chopstick to apply rhinestone glue to the back of each stone, and place rhinestone on the stave.  It helps if you hold the stone with a pair of tweezers while you apply the glue.
The best glue for the job is 5-minute epoxy (available at any hardware store). Follow the glue manufacturer's instructions and wait till the glue is completely dry before proceeding to the next step. If you don't have 5-minute epoxy then E6000 is also a good choice.

Step 4:

Repeat Step 3 for each stave. There are 12 staves per fan, with six rhinestones on each stave, so you'll need 144 rhinestones (1 gross) size ss30.


Step 5:

Use a yard stick or metre ruler to ensure each feather and stave are equal in length. The measurement from the tip of the feather to the end of the stave should be the same for each piece.
Hold the feather in place, with the stave on top (feather curling downwards) and proceed to step 6.


Step 6:

Use a small cable tie (in a colour to match your staves) and loop it through the holes on either side of the feather. Close the cable tie on the feather side and pull tightly, so the feather can't slip out.  Cable ties can be purchased from any electrical supply, hardware or computer store.  You can also use thin wire if you prefer.


Step 7:

Loop a second cable tie through the top holes and fasten it as for step 6.  Repeat for each stave.


Step 8:

Clip the ends off all the cable ties using scissors or side cutters.


Step 9:

Slide one washer onto a bolt, then slide a stave on (with the rhinestones facing down).
Now alternate each stave with two washers till you have used twelve Staves.  If there is still space at the end of the bolt, then you can add a few extra washers between the staves at either end.
Place one final washer on the end of the bolt after the last stave, and attach the nut.
To finish, screw on the locking nut (with the nylon centre), and tighten the locking nut on each bolt as tightly as you like. It may help to use a pair of pliers to hold the nut while you use a screwdriver to tighten the bolt.
The tighter the nut, the more firmly your fan will stay open. The looser the nut, the more easily your fan will open and close.


Step 10:

Lay out each fan, ensuring that the staves are spaced equally – anywhere between 90 - 180 degrees ( semi-circle) depending on your preference.
For left and right hand fans, lay out each fan side by side, so the top staves are pointing to each other.

Step 11:

Thread the nylon fishing line through the hole in one side of the first stave, where the lower cable tie is attached. Tie the fishing line in a secure knot, then thread it through the matching hole on the next stave.
Tie securely and repeat this step till you've tied the fishing line through each stave and your fan is strung together.
It's a good idea to put a drop of superglue on the knot at the beginning and end of your fan string, to prevent the knot from coming undone.  Try not to get any superglue on the fan stave, as it can leave a cloudy mark.

Make sure that you tie each stave together at an equal distance.
Test your fan by closing it – does it fold up correctly? If your fan doesn't close fully, then you may need to remove the fishing line and tie it again, leaving a slightly wider gap.

Your Ostrich feather fans are now ready to use!
Baby pink ostrich feathers, white staves & Swarovski rose ab rhinestones